.svg)

Implement powerful tracking codes, known as "tags," onto your webpage without any programming knowledge. These tags function precisely as desired, allowing you to track and analyze user interactions effortlessly.
Digital marketing professionals no longer need to grasp programming concepts to implement tracking code, known as "tags," on their webpages. Learning to utilize tags to expand data analytics sources has become an essential aspect of the profession. Thanks to the user-friendly Google Tag Manager (GTM), managing multiple tracking codes on webpages has become incredibly accessible. GTM eliminates the need for the average user to learn programming languages like JavaScript and HTML, saving valuable time that can be dedicated to marketing analytics and business growth.
These conveniences have made GTM a widely adopted solution worldwide, enabling companies to effectively analyze user interactions with their webpages. However, it's important to note that GTM itself is not an analytical service. Instead, it seamlessly integrates with services like Google Analytics (GA) to translate data obtained from tags. This translated data is then used to provide the analysis and insights that digital marketing professionals require. For a conceptual understanding of how Google Tag Manager empowers non-coders, we recommend reading our blog post "Google Tag Manager Explained - Goodbye Coders" to delve deeper into the GTM system.
Discover just how simple it can be to install tags on your webpages with GTM.
Getting Google Tag Manager on Your Webpage
To begin, it is essential to integrate the Google Tag Manager (GTM) code into your webpage's code. This process is simpler than it may seem, as GTM provides the necessary code once you create an account.
While Google Analytics (GA) does offer data tracking capabilities, relying solely on GA can significantly prolong the process. The traditional GA method involves manually editing a webpage's code to enable tracking for specific types of interactions. This means that for those interested in tracking data for specific events, considerable time could be spent inputting code into the webpage. This task can be particularly burdensome for digital marketers with limited coding and web development experience.
GTM's user-friendly interface eliminates the need for manual adjustments to webpages. Instead, it streamlines the process by allowing you to simply copy and paste the required code onto your webpage. With GTM, making necessary modifications becomes a straightforward task.
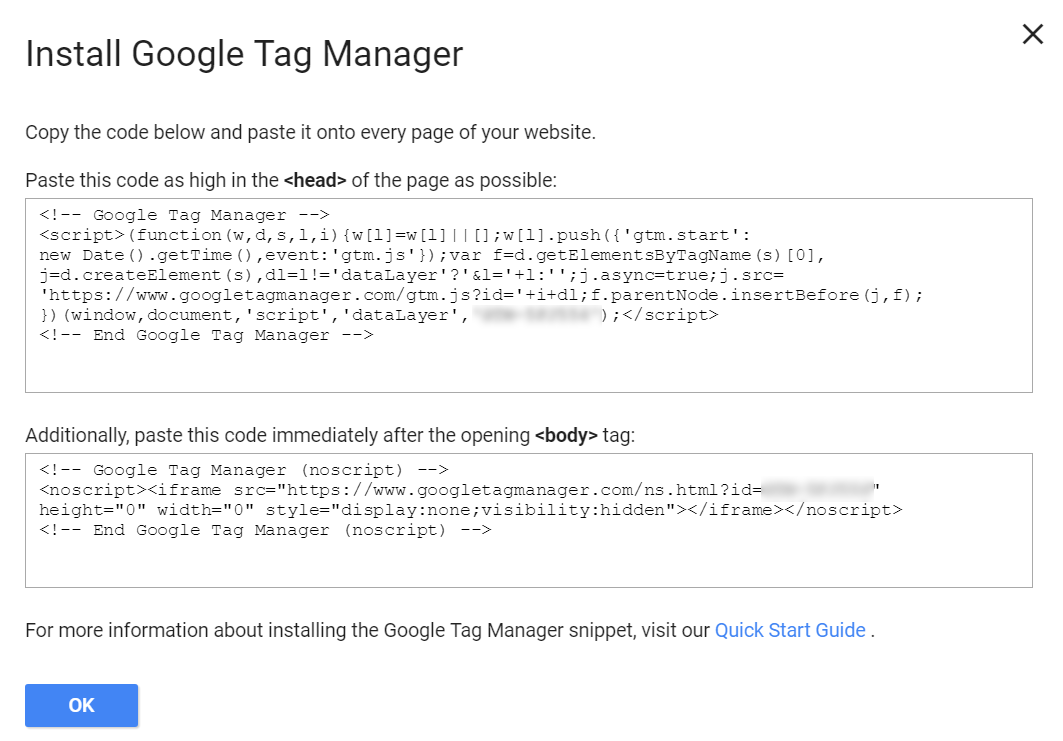
Figure 1: The screenshot displayed showcases the prompt presented by Google Tag Manager when users create a new account. To incorporate GTM into a website, the provided code needs to be copied into the webpage's HTML code. It's important to note that administrative access to the webpage is necessary to modify its HTML code.
Within GTM's prompt, you'll notice two distinct codes. The second code specifically targets website visitors who do not have JavaScript enabled on their devices while accessing the webpage.
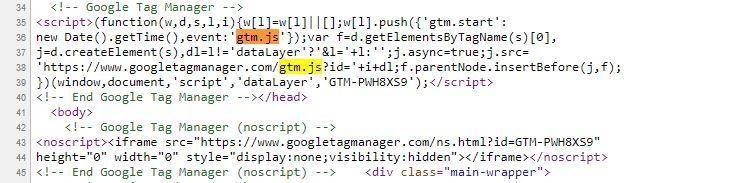
Figure 2: To view a webpage's source code, you can use the shortcut Ctrl + U or right-click on the webpage and select "View Page Source." The resulting screen will resemble the example shown. If you spot the term 'gtm.js' in the source code, it indicates that GTM has been successfully installed on the webpage. You can try this on various web pages to witness the widespread adoption of GTM.
Naturally, making modifications to a website's source code requires administrative access to that specific website. If you are working on behalf of a client, it is essential for the company to provide you with the necessary access permissions to edit their source code.
The basic functionalities, like tracking page views, can be effortlessly achieved by using a tag to send data to Google Analytics. Let's explore an example using an "event" tag, which represents user interactions on a website. In this case, we'll focus on installing an event tag to track button clicks on a website.
To set up new tags, navigate to the "Tags" section on the left side of the GTM interface. Selecting "Event" as the track type will present you with the following options: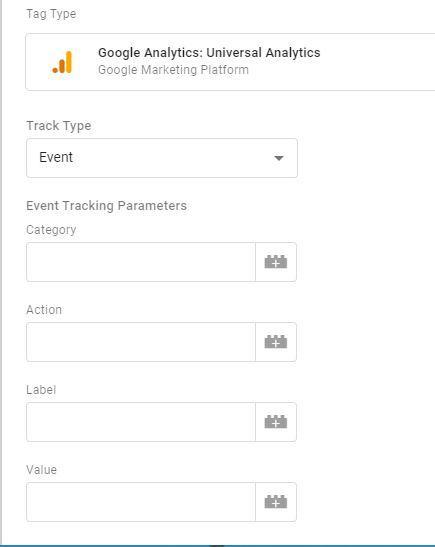
Figure 3: This form in GTM is where you can set up a tag specifically for Google Analytics and define its purpose. The fields provided here are primarily for the convenience of GTM users. As a digital marketing professional, how you fill in these fields will help your clients understand the intended objectives of the tags you've installed in GTM.
In the "Event Tracking Parameters" section, you will find four listed fields. The first field is "category," which helps organize and manage tags. It serves as a broad label to group tags tracking similar types of interactions, such as "Page View" or "Button" for checking interactions with clickable toggles on a webpage.
The second field is "action," which describes the specific nature of the interaction being tracked. Under the "Button" category, there can be further specifications like "Click" or "Expand Text" interactions. For videos embedded on a webpage, actions such as "Pause" or "Play" can be tracked.
Properly defining the "category" and "action" fields is crucial for effective tracking. Failing to do so can lead to difficulties in interpreting user interaction data through tools like Google Analytics.
The third field, "label," is optional and can provide additional descriptions to assist GTM users. In the example of a "Button Click" tag, the label could specify the specific part of the website where the tag is used, such as the title of a page ("About Us") for a "Button Click" tag.
The fourth field is "value," which is also optional and used when tracking quantities or specific data associated with the interaction. For example, it could represent the monetary value of a purchase made through a button click.
Understanding these parameters is essential, but it is not sufficient to set up a tag. To make tags effective sources of data, they need to be connected to "triggers," which requires further attention and patience, as discussed in Rezaid's previous blog on the topic.
Bonding Triggers With Tags on Google Tag Manager
Triggers are essential in programming tags to activate or "fire" when specific actions occur on a webpage. Taking the example of tracking button-clicks in GTM, let's explore how a basic trigger for a button-click can be set up to activate a tag.
To begin, navigate to the "Variables" option in the left-side navigation menu of the GTM interface. You'll observe that certain interactions that GTM can track are enabled by default.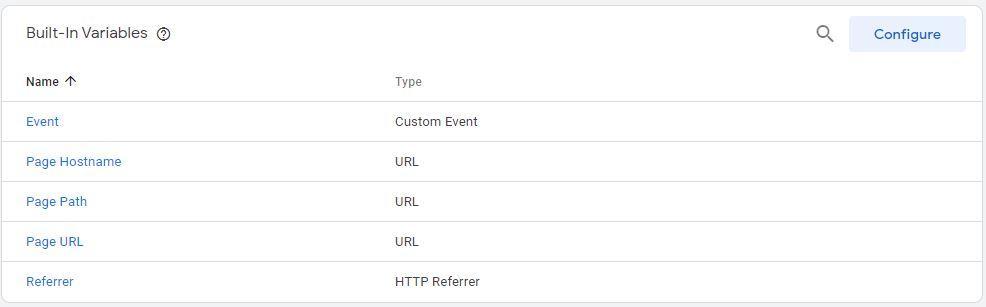
Figure 4: If you've been following along, you will encounter the screen shown above.
Next, click on the "Configure" option and scroll down until you find the tracking options for "Clicks".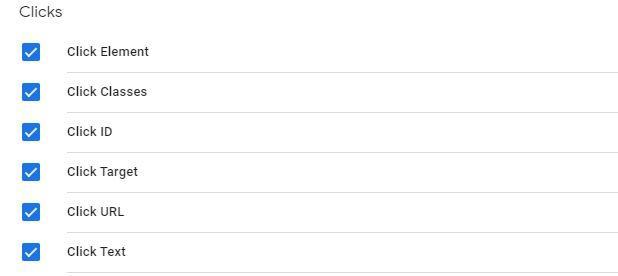
Figure 5: By default, these variables are not validated, so you will need to manually check them if you want to track clicks on your webpage. For future convenience, we have selected all of these variables.
This screen enables GTM to create triggers for tracking clicks on your webpage. If you are already familiar with the code that identifies the button on the page, you can proceed to the "Triggers" screen in the navigation.
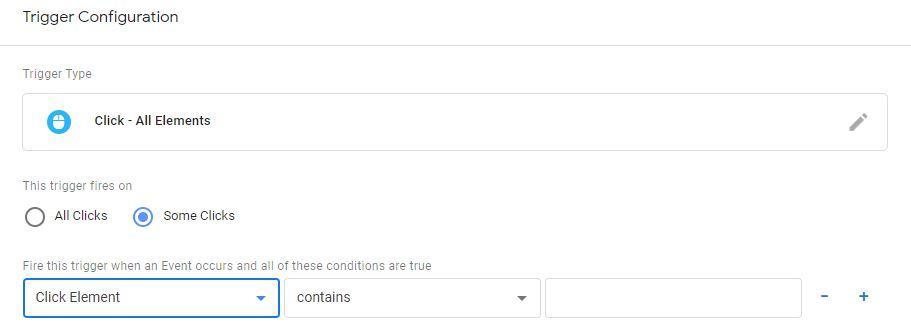
Figure 6: In the empty field at the bottom, you will input the string for the button you want to track. Don't forget to connect the trigger to the corresponding tag on the "Tag Configuration" screen!
If you are unsure about the string to track the button you want to monitor, you can refer to a helpful blog that guides you on locating specific click classes and elements using Google Tag Manager.
Once you have the necessary information, return to the tags configuration screen. If you already have a tag labeled and prepared to be triggered, simply connect it to the appropriate trigger through this user-friendly interface:
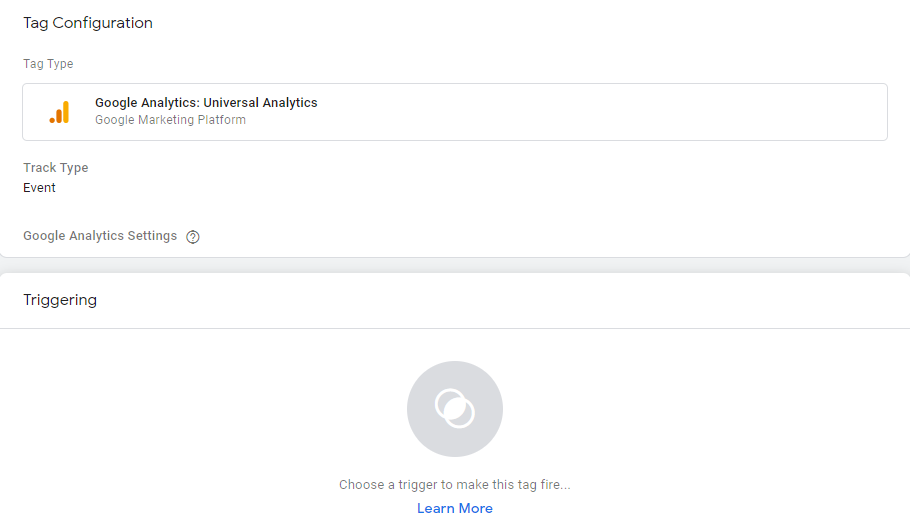
Figure 7: Connecting the trigger you have created to your tag is just one click away! By accessing this screen, you will find a list of potential triggers that can be used to activate a tag. Simply select the one that is relevant to what you want the tag to track.
Once you have completed the setup, Google Analytics will start receiving data from users who click on the button, regardless of whether they are using a desktop, laptop, or smartphone device. This valuable data will enable you to make more informed and effective marketing decisions.
Remember to utilize Google Tag Manager's "Preview" mode to ensure that your tag is functioning as intended. This allows you to check if the installed tag causes any issues on the webpage, although it is unlikely to disrupt the webpage's code to a significant extent.
That's all there is to it. Once you have verified that the webpage is functioning smoothly with the tag and that GA (or your preferred analytics tool) is accurately tracking data, simply "publish" your tag and let GTM and GA work their magic. You now have a wealth of new marketing insights at your disposal, empowering you to excel as a digital marketing professional.
Marketing Research Made Easy
This has provided an overview of event tracking through GTM for Google Analytics. However, GTM is not limited to Google Analytics alone. It can also send data to other services such as the Twitter Tag or LinkedIn Insight. Keep in mind that implementing the Facebook Pixel with GTM requires a separate process as GTM does not have built-in compatibility for sending tag data to Facebook. Familiarizing yourself with the process of implementing Facebook Pixel through Google Tag Manager is crucial in digital marketing.
If you're interested in using Twitter tags with Google Tag Manager, you can find more information here.
Both Google Tag Manager and Google Analytics are free-to-use services, offering immense potential for shaping the future of marketing and your business. While Google Analytics is not the only free analytics service available, Google Tag Manager stands out with its unique and powerful data tracking capabilities across multiple analytics platforms, not just Google's.
In the near future, having more than just a basic understanding of digital analytics is likely to be essential for anyone venturing into the marketing field. It is advisable to familiarize yourself and feel confident using this system, as it may become a cornerstone of marketing in the future.
Leave a Comment